Friday, February 28, 2014

Guest Post From Mimi At Three Is A Charm

Hello everyone! Hope you all are having a fine Friday! More guest posting goodness today from the wonderful Mimi! She is a super cool lady, and I adore her! Not to mention her gorgeous swatches!

--------------------------------------------------------------------------------------------------------

This is my first guest post as a blogger!  I'm so excited to be able to post on Bridget's blog.  I'm constantly drooling over her swatches and nails that I'm flabbergasted that she asked me to do a guest post.  

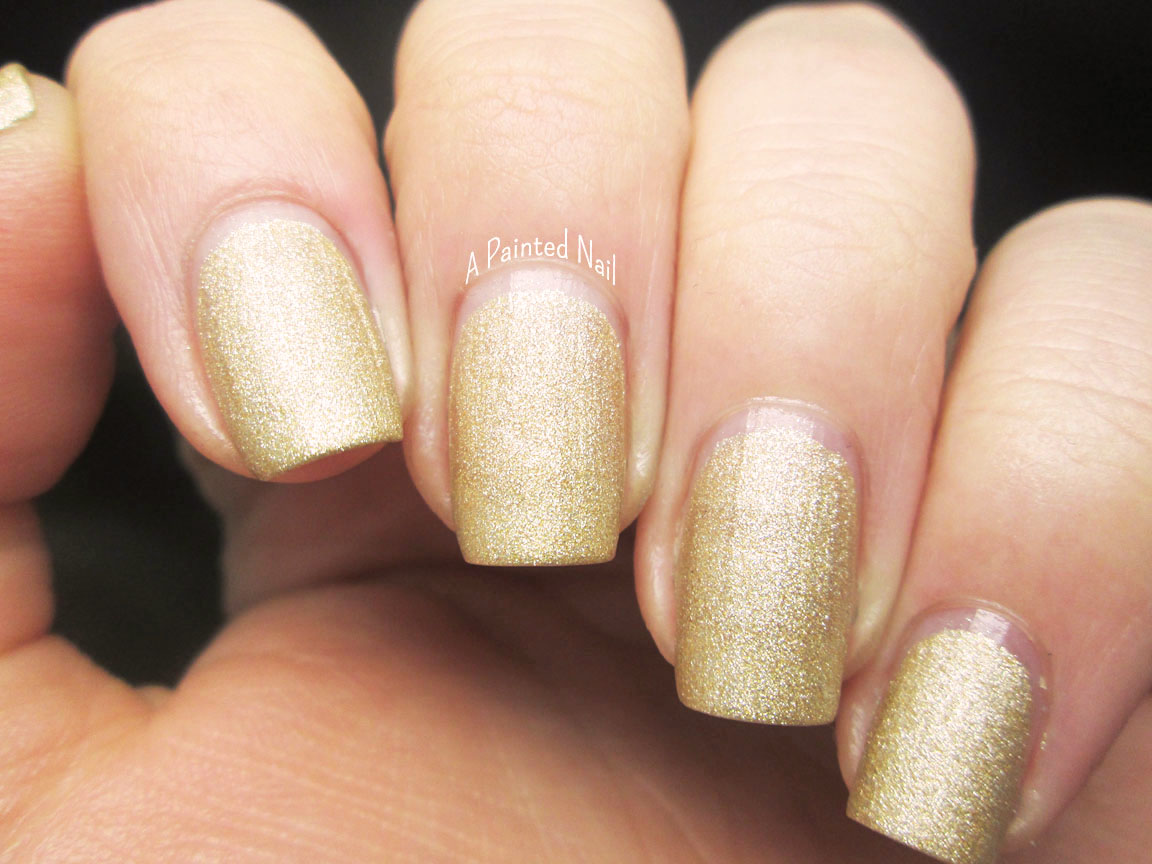
I wanted to do one of my favorite kinds of manicures, a jelly sandwich!  For the jelly I used L'oreal Miss Pixie a bright blue jelly.  And I used Lacquer Lust's Opal, a shimmery polish topper with iridescent flakes, to sandwich in between the jelly. 

First I used 4 coats of Miss Pixie.  Yes 4 coats.  Jellies, while beautiful, take a lot of work because they are so sheer.  You need it to be sheer to get that squishy quality of a jelly polish.  It gives the polish depth.  Look how pretty this is!!!


Then I used two coats of Opal on top of Miss Pixie and added another coat of Miss Pixie on top.  Opal ended up being quite disappointing to me.  The polish was really thick, but even though it was thick there wasn't much payoff.  There were hardly any flakes on the nail after one thick coat that I had to use two coats.  Even after two coats the flakes were sparse.  I shook the bottle vigorously after the shockingly disappointing first coat.  Not only were there hardly any flakes, but the flakes that were on there didn't really reflect off the polish like I how I was hoping for.  I think I was really disappointed because this was not cheap!  This was a $12 bottle of polish!  Oh and I forgot to mention that on my right hand some of the flakes didn't lay flat and were sticking off my nails even after I top coated it.  


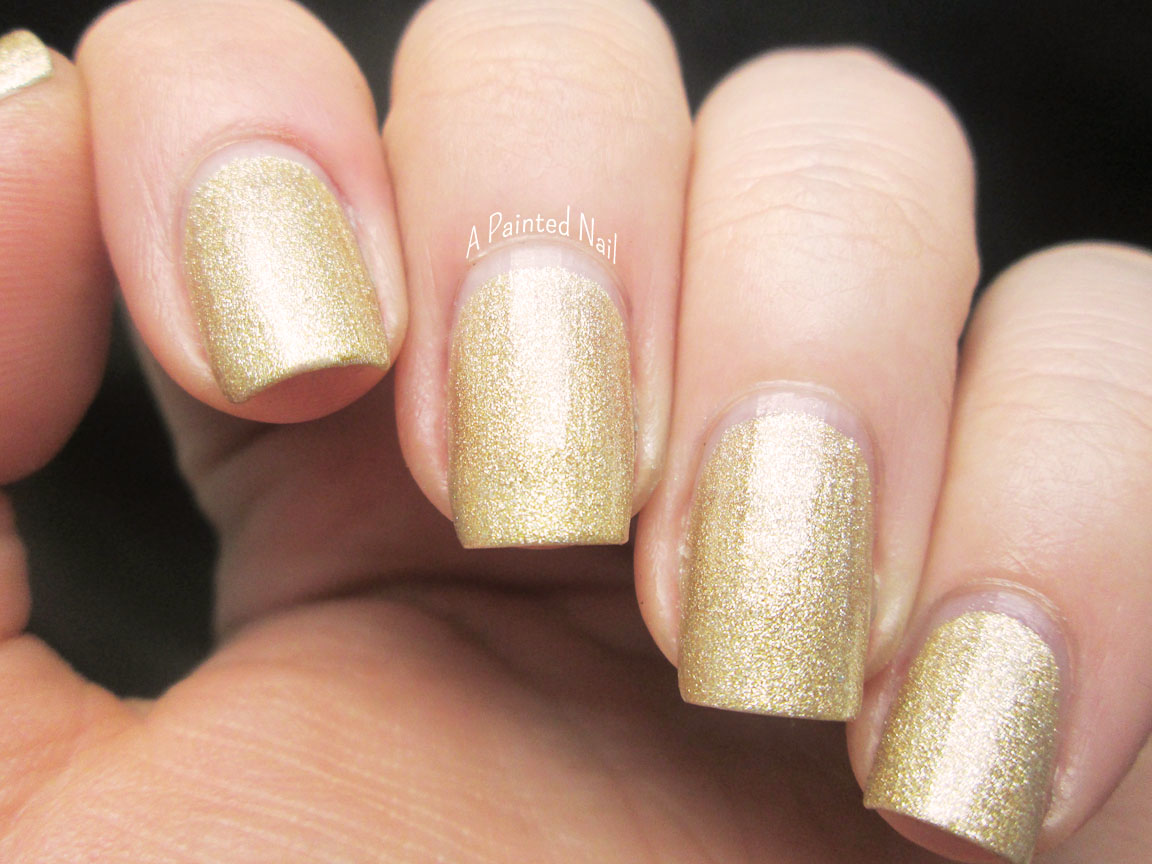
I always love to matte my jellies!  So here is my mani with my new favorite matte top coat, Hard Candy Matte-ly in Love. I do like the matte version way better!  Matte top coat saved the day!!


I hope you enjoyed this post even though I was a bit of a Debbie Downer.  I still love a good jelly sandwich manicure especially with flakies!  And I never know how to close a blog post.  So good day to you all!  

------------------------------------------------------------------------------------------------------------------------------------------------------------------

Well it is always a bummer to have a bad experience with a polish! But I think the end result is pretty spectacular, and that blue jelly is like whoa! Thank you so much Mimi for your honest review and killer jelly sandwich!

Thursday, February 27, 2014

Guest Post From Casey Lane Loves Polish

Hey guys and gals! Today's guest poster is my wonderful friend, Casey from Casey Lane Loves Polish. She is such an awesome lady, and one of the most talented nail artists I know. She also kills it with the macros!

-------------------------------------------------------------------------------------------------------------------------------------------------------------------

Hello everyone! How are you all doing? I was so excited when Bridget said I could do a guest post for her. She is one of the first friends that I made in the nail community, and she's one of the sweetest girls on here I've met. Hopefully my little post will help her out! :) 

This week work has been especially stressful for me, and my hubby's work has been stressful for a long time. That takes a toll on everyone in the house, so I haven't taken much time for nail art. Someone told me recently (my therapist to be exact) that nail art is therapeutic for me, kind of like my version of meditating. I believed him, but hadn't actually put it to a definitive test. Until Thursday night. I had spent the previous 2 days working on an almost 30,000 line spreadsheet and around 8 pm I started getting more emails (from our CEO) about it... it was like a stress switch. I was instantly tense and anxious and worried all wrapped into one. So I decided to put the "nail art meditation" theory to test. Sure enough, he was right, he pretty much always is but don't tell him I said that. After spending a little time on a simple but favorite nail art design I felt better. My head was clear and I actually felt relaxed. I wasn't super surprised, but I was so happy to see and feel such instant results. 

So, here is the result of my stress induced nail art meditation. :) Some simple vintage rose nail art using a couple of my new OPIs and a couple of old favorites. 


For this manicure I started with 3 coats of OPI Hey Baby from the new Gwen Stefani Collection on my pinkie, index finger, and thumb. Then on my middle and ring finger I applied 2 coats of OPI Don't Bossa Nova Me Around. 

To make my roses I used all dotting tools. I go back and forth on my technique on these... sometimes I prefer brushes, others I want to use dotters. I think the dotting tools are maybe a little easier, but that could have just been the day. 

I used Hey Baby for the base, OPI My Very First Knockwurst for the swirls, and for the leaves I used OPI Jade Is The New Black and Thanks A Windmillion. After a little dry time I topcoated with Glisten and Glow HK Girl topcoat. 

I love these nails so much. I'm still wearing them, and I'm a little sad to take them off. But I have swatching to do, duty calls. :) But I have enjoyed this mani while I've been wearing it. 

What do you think? Have you all tried vintage roses? If you haven't you definitely should! It's one of the easiest nail art designs and has a big impact. There are tons of tutorials online that I've used, and combined, to find what works best for me. Be sure to follow me on Instagram (@caseylanelovespolish) and on my blog (www.caseylanelovespolish.com) for more manis and swatches! 

I hope you all love this mani as much as I do! And even though I love guest posting for my friend Bridget, I hope she's up and running again very soon! Thank you again for the opportunity! :) 

**All polishes in this post were purchased by me for my own personal use.** 

-------------------------------------------------------------------------------------------------------------------------------------------------------------------

I love vintage roses, and I definitely need to give them some love once I get my camera situation resolved. And I so understand the calming effects of nail polish! Of course, it could totally be the fumes. Just sayin...

Thanks so much Casey!

Wednesday, February 26, 2014

Guest Post From Melissa at Honey Bee Nails

Hey y'all! Today I have a post from the adorable Melissa of Honey Bee Nails, on IG. She has killer swatches and amazing nail art. I am so thrilled to have her share a great mani today!

-------------------------------------------------------------------------------------------------------------------------------------------------------------------

Hello, readers of A Painted Nail!  My name is Melissa; some of you may know me as @honeybee_nails on Instagram.  I am so happy to be guest posting here on Bridget’s blog!  When she approached me to ask if I would be interested, I nearly fell over.  I’m honored that she finds me worthy of this task.  Here’s hoping I don’t let her (or you!) down.

I spent a good deal of time thinking about what I would post for my “big screen debut”, as I’ve been calling it.  Then, it hit me.  Why not post about the indie that started it all?  I just recently received this polish, but I have admired it for a very long time.  This polish is the reason I became a nail junkie in the first place!  It all started a few years back, when Pinterest was the new hot thing.  I saw a pin of some nail art, couldn’t tell you what it was now, but it sent me on a mad pinning spree.  Through a series of clicks, I somehow stumbled upon a nail polish color called Jawbreaker.  As soon as I saw it, I knew that I had to have it.  I had never seen anything like it before!  I had no idea who it was made by or how to purchase it – I didn’t even know that indie polish existed at that time.  Since that day, it has sort of haunted me not knowing.  Fast forward to today and, like magic, it was in my hands!  I ordered one of the new Beauty Boxes from Pretty & Polished, and included was a mini bottle of Jawbreaker.  I didn’t know that it was Jawbreaker at first because the bottle wasn’t labeled.  It wasn’t until I picked up the card included in the box and read these words that I knew: 

“Thank you for purchasing a Pretty & Polished Beauty Box!  The mini we have sent this month is “Jawbreaker”.  We wanted to send this as our first mini sample because it is a polish we have sold for a long time and was one of the first to put Pretty & Polished out there as a creative brand.”


I was so excited to get this polish on my nails, and it did not disappoint in the slightest!  I decided to layer it over a base of OPI’s My Boyfriend Scales Walls so that I wouldn’t have to use too many layers of Jawbreaker.  I want to make this little baby last.  So, without further ado, here is Pretty & Polished – Jawbreaker.  2 thin coats over a base of MBSW, topped with Glisten & Glow’s HK Girl top coat:


Of course, I can never leave anything alone for too long, so I decided to add a little chevron accent to the mani.  I used Nail Vinyls single chevrons to create this look.  From pointer to pinky the colors are I Love Nail Polish brand Fleet Week, A Fresh Evergreen, Grape Alicious, and Very Ornamental.


That about does it for me.  Thanks so much, Bridget, for giving me this opportunity!  I hope your new camera arrives safe and sound – and quickly – so that you can get back to posting your own gorgeous nails! 

-------------------------------------------------------------------------------------------------------------------------------------------------------------------

Thank you so much Melissa! I loved your story! I think it's something all indie lovers can relate to and appreciate!

More guest posting greatness tomorrow!

Tuesday, February 25, 2014

Guest Post From Rosie at Mama's Manicures

Hello wonderful friends! I have another great guest post lined up for today! Rosie was kind enough to volunteer almost immediately, to help me out with posting. I recently found her on IG and she has some amazing free hand skills! I have serious nail art envy you guys!

------------------------------------------------------------------------------------------------------------

Hey folks!! I'm doing a guest blog for Bridget while her camera is on the fritz! My name is Rosie and you can find me on Instagram at @maherwoman and on Facebook atwww.facebook.com/mamasmanicures!! :)

Onto the nails!!


Most of the time, I like to do more complex designs, but sometimes a girl just needs to do something more basic. Here are two of my favorite colors: China Glaze's First Mate (navy blue) and OPI's gorgeous glitter from their 2013 Mariah Carey Christmas line, My Favorite Ornament! I had a flash of inspiration last night that they would be excellent together. 


Aren't they make a perfect match?

So if you have the need for something a little more basic, give this design a go! A perfect match and a little line work can go a long way! :)

-------------------------------------------------------------------------------------------------------------------------------------------------------------------

I totally agree, simple and clean can be a nice change of pace! And the navy/silver color combo is always a stunner. I, personally, am loving the textural contrast the two polishes create.

Thank you so much, Rosie, for lending a hand! 

Rosie just started a blog as well, so be sure to show her some love and check it out!

Monday, February 24, 2014

Guest Post From Tracey Loves Lacquer

Hey guys! So you may have noticed a bit of sporadic posting lately, and I do apologize! My camera has decided to crap out on me! I was able to order a new one, but alas Mercury is in retrograde and has caused my shiny new camera to be on back order (kidding about the mercury thing). Since I am unable to essentially blog, I reached out to the incredible nail art community and asked a few people to guest post for me!

First up is the awesome Tracey, she was one of the first people I really "met" on IG and I really love her skittlette mains. She comes up with the best color combos!

------------------------------------------------------------------------------------------------------------


Hi Everyone !!!


This is Tracey here - aka TraceyLovesLacquer on Instagram.  When the lovely and amazing Bridget contacted me the other day about doing a guest post for her, I just about fell off the couch

!!!!  We've been following and supporting each other for awhile now on IG and I'm a huge fan of her work, so of course I jumped at the chance to help her out.


Today I have for you a few of the polishes from the OPI Spring/Summer 2014 Brazil Collection.  When I first saw pics of this collection late last year, the first thing that stood out for me was the neutrals.  Sure the collection has some incredible bright and fun colors but I love me a good neutral. If its mushroomy or taupe or greige in any way, shape or form, I'm all over it.


So today I'm featuring from left to right, I Sao Paulo Over There, Taupe-less Beach & Don't Bossa Nova Me Around. Also making an appearance is My Boyfriend Scales Walls from the 2012 Spider-Man Collection. For me - MBSW is the best "dirty white" on the market and pretty much the only white I use for nail art.  I'm already into my 2nd bottle and have a 3rd one on standby.


Here's a look at my mani with just the base coats.  I found the formulas on all the polishes to be really good.   They were rich and creamy, self leveling and opaque in 2 coats.


And now for some art!!!!!


On my index I have a dotted gradient over my base of MBSW and on my ring finger I have a striped gradient using Sao Paulo and Taupe-less Beach sponged over some striping tape. I then pulled the striping tape to reveal the base of Don't Bossa Nova Me Around.  Throw in some more dots to bring it all together and call it done!


Well I hope you've enjoyed my post. You can find me at https://Instagram.com/traceyloveslacquer

Thanks again to Bridget for asking me to guest post for her.  I meant the world to me!!  HUGS, Tracey

-------------------------------------------------------------------------------------------------------------------------------------------------------------------

Thank you so much Tracey! I am loving the mix and match neutrals! Don't Boss-A Nova Me Around is definitely on my to-buy list!

Hope you guys enjoyed Tracey's awesome mani!  I can't wait to share the rest of the posts with you!

Thursday, February 20, 2014

My Nail Care Routine and Favorite Products

Hey y'all! Today is a non-polish post, but it is related to nails! This is something I have wanted to do for a while, but never got around to posting it. I wanted to share my nail care routine, and the products I use. It took me a long time to figure out what worked best for me, and settle into a routine that would keep my nails and cuticles healthy and moisturized.

When I first started blogging, I knew absolutely nothing about nail and cuticle care, and all I have learned comes from the master, Loodie. Seriously, she is my nail sensei and I do everything Loodie says.

Disclaimer: I am not a nail care professional. The following information is from my personal experience.

Through trial and error, I learned what products worked best for my nails and skin, and others that leave my cuticles looking like a ragged mess! I can't use any sort of balm for some reason, and most cuticle oils as well. Cuticle removers are the worst offenders! I guess I just have really sensitive skin. I stick with these three products and never ever stray.

My routine goes as follows, using O.P.I. Avo Juice hand cream, Jojoba Oil, and Nfu Oh Cuticle Remover.


Daily - Moisturize!!!! At least three times a day, and usually more, especially if I have a swatch day. I also apply lotion directly to my nail plate and along the cuticle lines and massage it in.

Weekly - Once a week, I use the Jojoba oil on my nails and work it in with lotion. If I use it more often, then my cuticles will start to peel. Weird, I know. I also use the cuticle oil after a long swatch day if I have used a ton of acetone.

Bi-weekly - I use the Nfu-Oh cuticle remover and an orange stick to remove any dead skin growth around my cuticles, side walls and underneath my nails. It is incredibly gentle, and contains lanolin (a yellow waxy substance secreted by woolly animals) which is awesome for skin. I never ever clip my cuticles. Ever. I use nippers, but only for hang nails. I follow up with Jojoba oil and Avo Juice lotion and usually wear moisture gloves. (I will be posting a review of the Nfu Oh Cuticle Remover soon!)

When I slack or forget to follow my routine, I can always see a difference. My skin feels tight, and I start to see dry nail beds. I am also more prone to breaks with dry nail plates.

While my routine may not work for you, I encourage you all to find some good products and a routine that fits your needs. Your nails will thank you!

O.P.I. Avojuice hand cream can be purchased from most places that carry O.P.I. products. Now Organic All Natural Jojoba Oil can be found in the vitamin and supplement section of most stores. Nfu Oh products can be found on line. Nfu Oh Cuticle remover retails for $11.50 a piece

Monday, February 17, 2014

Lacquer Lust Ruby From The Birthstone Collection

Hello friends, happy Monday! Hope you all had an awesome Valentine's weekend! I had a great date night with my husband, we saw American Hustle, which was so great! Jennifer Lawrence was hilarious and totally stole the show. She even had a bit about nail polish! Saturday, I got to have lunch with some other lacquer heads in Austin and San Antonio. It was my first "meet up" with other nail polish people and it was a blast!

Today, I have Ruby from the Lacquer Lust birthstone collection. My birthday is in July, and the ruby is my birthstone. It took me a while to get this, but I am so glad I did! Even if it red!

Please Note: Products shown were purchased by me for my personal use.


Lacquer Lust Ruby (Birthstone Collection)

Ruby, just like the stone, is a bright red with pink undertones. It is a linear holo, just like all of the birthstone polishes. It has an almost jelly feel when applied, and I think it is an awesome representation of a ruby. The whole set is beautiful actually! Formula was flawless, this is one coat of perfection! All that color and holo rainbows in one amazing coat!


Now that I finally have Ruby knocked off my Lacquer Lust wish list, I am a happy addict! Naturally there are quite a few more, but this one was the priority!

The birthstone collection is part of the Lacquer Lust core line, so if you don't see your particular month/stone in stock, check back during the next restock! As of right now, there are quite a few colors in stock - Ruby is however, sold out.

Please Note: Products shown were purchased by me for my personal use. All opinions are my own. For more info, please read my disclaimer.

Lacquer Lust is available on line. The Birthstone Collection retails for $12.50 a piece.

Friday, February 14, 2014

Valentine's Day Nails - Two Ways

Hey guys and gals! Happy Friday, and Happy Valentine's Day! I hope you all have a day filled with love and joy. And pretty nails. Cause that's the most important thing, right? Just kidding...sorta...

So, remember when I said I had no clue what I was doing for Valentine's Day? Well, I guess my brain had some sort of crazy inspiration, because I came up with two designs! Yep, I'm feeling pretty awesome right now. I also tried to go a little different with my designs, and add my personal style to them as well, instead of sticking with more traditional looks.


Used:
Takko Lacquer - Spirited Away
O.P.I. - Black Onyx (for stamping)
MoYou London Scholar Collection - Plate #05
Born Pretty Studs

So I may have ordered the MoYou London scholar plate just so I could do this mani. I love the little doodle heart and the studs, and the gorgeous Takkito. Perfection. It almost broke my heart to take it off.


Used:

O.P.I. - LAMB
O.P.I. - MVIB
Zoya - Neely
Zoya - Louise
Born Pretty Studs
Dotting Tool

This is probably my favorite color combination. I mean, how perfect is mint green and gold together?! The inspiration for the most awesome heart shaped leopard print is from MajicBeenz on Instagram. Which I love, even though I am not really a fan of leopard print (but yet this is the second post in a month...). Also studs. Heart shaped studs no less!


Well, that's all for today friends! I am off to bake some cupcakes with the girlie and then an actual date with the Mr.! Hope you all have a fabulous day of love and get to celebrate it with whoever you love!

Wednesday, February 12, 2014

O.P.I. Love Angel Music Baby from the Gwen Steffani Collection

Hello friends! Happy Wednesday! O.P.I. recently released another artist collaboration, this time with Gwen Steffani from No Doubt. As much as I love Gwen Steffani - Tragic Kingdom was the soundtrack to much of my high school life, I was only intrigues by one polish, Love Angel Music Baby. All the other colors in the collection were rather underwhelming. I do think the variety of finishes is rather cool, but it doesn't seem as there was a lot of creativity involved in the color creation process. Compared to the Nicki Minaj and Katy Perry collections, this one is a snooze-fest.

Please Note: Products shown were purchased by me for my personal use.


O.P.I. with Gwen Steffani - Love Angel Music Baby

L.A.M.B. is a pale nude gold shimmer with a satin/matte finish. I think the satin finish is going to be a trend this year, and as long as they look like this, I am totally fine with it! Formula was a little on the thicker side, but not hard to work with. This is just one coat! It dries super quick, as well. Since it is a satin finish, there is no need for a top coat.


But, I aim to please! And as soon as I was done drooling over the gorgeous satiny shimmer, I had to see what it looked like shiny. And I knew you guys would want to see it too!


(with top coat)

Oh how I love this polish! Satin or glossy, it is really a stunning shade, and totally worth grabbing. I suspect it might make a reappearance very soon in the form of nail art and stamping! I am dying to see how well it plays with my MoYou plates.

The entire Gwen Steffani O.P.I. collection is currently available, but it is LE, so grab them while you can!

Please Note: Products shown were purchased by me for my personal use. All opinions are my own. For more info, please read my disclaimer.

Tuesday, February 11, 2014

Messy Spring Floral Nail Of The Day

Hey y'all! So I recently stumbled on a nail art blog/tumblr full of rad designs and tutorials. Candice of MrCandiipants, is crazy talented and so funny! I just adore her! One of her more recent designs really caught my eye, so I promptly watched the YouTube video and painted myself some pretty nails! Also, you should really check out her other tutorials. I'm not one for YouTube videos, but I have watched a lot of hers lately, she is quite entertaining!


Used:

O.P.I. - MVIB
O.P.I. - Funky Dunky
China Glaze - Tart-y For The Party
Zoya - Marley
Essie - Navigate Her
Zoya - Josie
Zoya - Darcy

Nail art brush

Floral designs aren't something I normally do, but I am really loving this technique. It is messy and a bit chaotic, but so super pretty! And of course I am still stuck in this spring-ish color palette. I just can't stop myself. 


So that's all for today! I have an awesome polish swatched and a really fun Valentine's Day post coming up. Otherwise, have a great week!

Friday, February 7, 2014

Zoya Color Your World Swatch Spam

Hey guys! I am finally getting a chance to post my polish from the Zoya "Color Your World" promo from the beginning of the year. I ordered twice, and it took forever to get both packages, but I finally have them swatched and ready!

Please Note: Products shown were purchased by me for my personal use.


Zoya - Arizona
(Beach Collection Summer 2012)

Arizona is a yellow toned orange crelly (cream/jelly hybrid). This is two thicker coats, and I probably could have used a third. Average dry time for Zoya.


Zoya Pixie Dust - Chyna
(Pixie Dust Premier Collection Spring 2013)

Chyna is from the first Pixie Dust release, and is a deep red with textured glitter. 2 coats for full coverage, longer dry time due to the Pixie Dust formula.


Zoya - Dream 
(Zenith Collection Winter 2013)

Dream is a deep blue jelly filled with holographic glitter flecks. It has the same finish as the Zoyas from the winter 2012 collection (Aurora, Blaze and Storm). 2 coats for full coverage. A little on the thicker side for Zoya, but no issues with application.


Zoya - Elodie
(Gossip Collection Summer 2008)

Elodie is a warm coral jelly. I had no clue it it was a jelly until I swatched it. It is also very similar to Zoya Maya, just a touch more orange. But close enough that I really don't need both and will most likely part with one if I ever have a blog sale. Other than that, it is really pretty! 3 coats for full opacity, since it is a jelly. A bit patchy on the first two coats, and still a tiny bit of VNL (visible nail line) on the third.


Zoya - Josie 
(Stunning Collection Summer 2013)

Josie is a bright grassy green cream. 2 coats for full coverage. A bit streaky on the first, but the second leveled out perfectly.


Zoya - Neely
(Lovely Collection Spring 2013)

Neely is a soft minty green cream. 2 thicker coats for full coverage, 3 if you paint thinner. The first coat was on the patchy side, but a thick second covered completely. 


I love that Zoya always has really great promos and specials like this. Zoya is by far my favorite mainstream brand, and I am more than happy to splurge every now and then!

Please Note: Products shown were purchased by me for my personal use. All opinions are my own. For more info, please read my disclaimer.

Zoya nail polish is available on line. Products retail from $9 to $10 (for Pixie Dust) a piece.

Tuesday, February 4, 2014

Free Form Paisley Nail Of The Day

Hey y'all! Hope all is well is your corners of the universe. I'm kinda shocked that January is already over! I haven't even thought about doing any Valentine's Day stuff yet! If there is anything you all would like to see, please feel free to comment! Suggestions are always welcome. 

But I have been thinking a lot about spring and warmer weather. I have been dying to start playing around with bright colors again and I think that's what lead to the mani I am posting today. The original idea came from an older post on the blog, Nailed It. Funny enough, Katy's inspiration came from fall colors - mine from spring!


Used:

Essie - The Girls Are Out
Essie - Navigate Her
Essie - Full Steam Ahead

Nail art brush

To be honest, I wasn't quite sure where I was going with this when I started. I am on a mission to practice my freehand skillz as well as keep up with at least one weekly nail art related post. But I am super pleased with the outcome and I think they are way cute! 


Color plays a huge part in my life, it's how I interpret my world. Spring and summer pallettes are where my creative process lies and lately, I have been gravitating towards these types of colors. Sorry winter, it was great while it lasted, but I'm ready to move on!

I know we should wear/use what ever color we feel like, but sometimes certain colors seem more appropriate for certain things. Do you think color is a seasonal thing? 

Sunday, February 2, 2014

Sunday Stamped: MoYou London Advanced Stamping

Hello all you wonderful people! Hope you are having a wonderful Sunday! I have been sick since Thursday and am finally starting to feel quite a bit better. I absolutely despise being sick, but thankfully it left me time to catch up on The Originals, Nashville and The Vampire Diaries as well as plan out some awesome posts for this next week! P.S. I am pretty sure that crappy tv is the best cure for the common cold!

For this week's edition of Sunday Stamped, I wanted to try a little something different. Advanced stamping, or decal stamping, is a method of adding color to a stamp design. It has become more and more popular, and since I have lots of new stamping goodies, I wanted to try it out myself.


Used:

Essie - Naughty Nautical

O.P.I. - Black Onyx
Essie - The Girls Are Out
Essie - The More The Merrier

Nail art brush

Overall, I think it is a really cool look, but quite difficult to pull off. But, like most nail art related stuff, I'm sure it gets easier with practice. To create the decal, you pick up the image as normal, but instead of stamping it onto your nail, you transfer the design to saran wrap or a zip lock bag. After that, you apply color to the negative areas and then apply a clear top coat. Once it has all dried, you remove it from the plastic and place it onto you nail, sealing it with another layer of top coat.

If you guys are interested, I will put together a pic tutorial of how I do it!


I used one of the new MoYou London plates I recently ordered, and once again I am blown away. This design is from the Scholar Collection and it is full of really cool science stuff as well as some fun doodles. I know that I should try out some other plates or brands, but honestly, I am incredibly happy with all the MoYou London stamping stuff!

Well, that's all for today! I'm gonna go drink some Chamomile tea and maybe watch some more wonderfully crappy tv!
Related Posts Plugin for WordPress, Blogger...