Thursday, January 30, 2014

Mattefied Leopard Print Nail Of The Day and Sally Hansen's Big Matte Top Coat

Hey guys and gals! So today, I had an entirely different post planned out, but it didn't work out. Boo. Instead, you get some nail art and a review all in one! 

I spent all of yesterday afternoon playing around with some of my new Zoyas from the "Color Your World" promo at the beginning of January. Swatch spam to come soon, I may have placed two orders and am still waiting on one to be delivered.

Please Note: Products shown were purchased by me for my personal use.


Used:

Zoya - Arizona
Zoya - Darcy
O.P.I. - Black Onyx
Sally Hansen - Big Matte Top Coat

Dotting tool

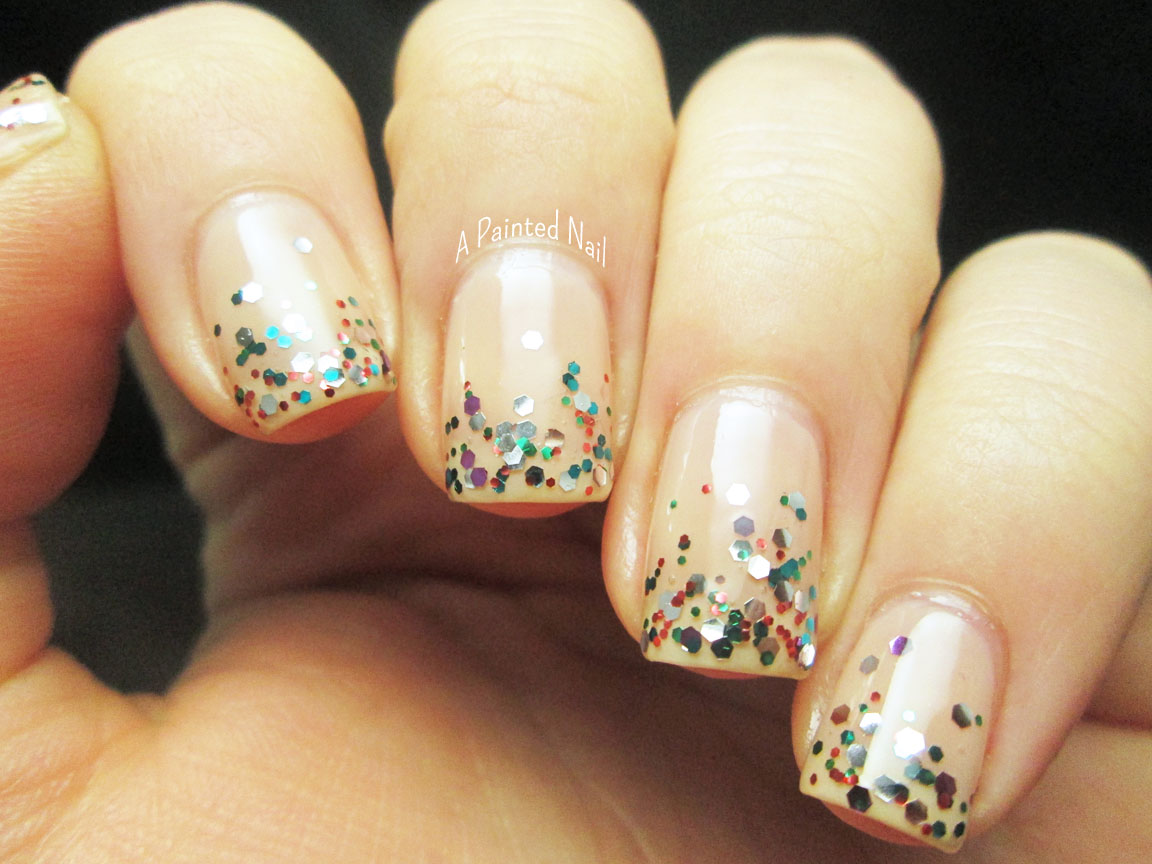
So after three failed attempts at nail art yesterday, I finally settled on doing a leopard print. This is actually my first time doing a leopard print mani! It's usually not my thing, but I wanted to see how it would look and if I could actually do one. I used the tutorial from Chalkboard Nails to create the mani, and it was actually pretty easy! If you have had issues in the past, I highly recommend you taking a look and giving it another go.


After I had finished, I thought it would be fun to try out my new matte top coat. My previous one has gone to polish heaven, and since Sally Hansen recently released a huge line of nail art tools, part of the line are various top coats - one being a matte, I grabbed a bottle.


Sally Hansen - Big Matte Top Coat

The Big Matte Top Coat is part of a line of "Big" top coats. While they aren't exactly big as in quantity (they are .04 fl oz), there are quite a few different ones to choose from. Shiny, matte, crackle, smokey (idk?) and different glitters. The matte top coat dries to a satiny finish with no streaks or white clumps and leveled out nicely. My only issue is that it is on the thicker side, and I had some minor smearing from it. I made the rookie mistake of not applying a traditional top coat first, in order to seal my nail and prevent smearing. It also takes a bit longer to dry, but once it looks matte then it is dry to the touch.

It retails for a lot cheaper ($5.49 - $5.99) than the Essie or O.P.I. matte top coats, and I have seen a comparison between this and the O.P.I. that are pretty even. Since I don't have either, I cannot do my own tests, but you can goolge it and see the results.

Hope you all have a great day!

Please Note: Products shown were purchased by me for my personal use. All opinions are my own. For more info, please read my disclaimer.

Wednesday, January 29, 2014

Mod Square Nail Art with Pure Nail Polish

Hey friends! It's time for another video tutorial sponsored by the awesome Pure Nail Polish! This time around I wanted to go for a simple, but high contrast look. Also, it never hurts to practice my free hand, cause yeah, I need practice!

Please Note: Products used were provided by the company/creator for artistic purposes.


Used:

Pure Nail Polish - Loyal
Pure Nail Polish - Blameless

Thin nail art brush

Well, aside from my line work being a little less than crisp, I am pretty stoked about the overall look! Blameless is such a great white to use for nail art. It is very opaque and flows nicely. Normally, I wouldn't use a white over a dark base, but the Pure polishes are so great to work with that I had no problems at all.


And here is the new video tutorial! Enjoy!


Please Note: Products used were provided by the company/creator for artistic purposes. All opinions are my own. For more info, please read my disclaimer.

Pure Nail Polish is available on line. Products retails for $5.00 a piece.

Tuesday, January 28, 2014

Rescue Beauty Lounge Coquette

Hey friends, happy Tuesday! We have a snow day, so the girlie is home from school. Not that it is actually snowing, just lots of ice on the roads and Texas drivers freaking out because of said ice. Totally fine with me, I do not want to drive today! We are going to spend the day making cookies and playing with nail polish!

Today, I have another polish from the Rescue Beauty Lounge Fan 2.0 collection. When Ji had the open voting for colors, I read the description for Coquette and was hooked. You all know my undying love for coral polishes! Needless to say, I voted for this particular color, and am so thrilled with the final result! 

Please Note: Products Shown were purchased by me for my personal use.


Rescue Beauty Lounge - Coquette (Fan 2.0 Collection)

Coquette is a bright pink toned coral crelly (cream/jelly hybrid) loaded with silver micro flakies and shimmer. Do I even need to say that I'm bananas for this polish?! Probably not. I think the pictures speak for themselves as to the beauty of it. It is the perfect pink. The warmer tone is bright and fun without being over the top. The flakies add the right amount of depth and interest. Not to mention the ever so slightly squish of the crelly base. Sigh. Another Rescue Beauty Lounge stunner! Formula was spectacular as all RBL polishes. 2 flawless, buttery smooth coats. I had the teensiest bit of VNL (visible nail line), but not enough to bother with a third coat. Top coat for maximum glossy goodness.


Ugh, gotta love that squishy look! I think Coquette nailed the original idea on the head, feminine, sexy and fun. Pretty sure this is my go-to pink from now on. Rescue Beauty Lounge colors never cease to amaze me, and I love each one of my RBL babies. I cannot wait for the next collection!

Products shown were purchased by me for my personal use. All opinions are my own. For more info, please read my disclaimer.

Rescue Beauty Lounge is available on line. Products retail between $18-$20 a piece.

Sunday, January 26, 2014

Sunday Stamped: MoYou London Mermaid Nails

Hi y'all! So another Sunday has come and I find myself enjoying the Sunday Stamped theme a lot more this time around. I totally blame it on MoYou London. More specifically, the MoYou London squishy stamper. It has really improved my stamping overall, and I think it is totally worth the extra cash, if stamping is something you are in to.  But the MoYou London plates are amazing too! And I can't get enough if them!


Used:

Zoya Ziv over Zoya Charla


Mermaid nailses!! I was so worried that it wouldn't turn out right and I would have a big fail, and it did at first. But that was total user error and my polish choices. After a third attempt, I finally got the intended effect and I LOVE them!!! 


MoYou London has really changed the way I feel about stamping. The only down side is that it takes a little longer to get the package. But the wait is so worth it!

Have a great Sunday you guys!


Friday, January 24, 2014

Wavy Accents Nail Of The Day

Hi friends! Hope you guys are having a great Friday! How's that polar vortex treating you?! The weather has been nuts here! Needless to say, Texans are not well equipped dealing with crazy winter weather, and I am staying home with my girlie today, in front of a nice warm fire!

So, like most you of I'm sure, my inspiration for nail art comes from some very talented ladies. This NOTD is no exception. Sammie from The Nailasaurus is pretty amazing, and I have already given a few of her designs a go. My current fav, is the wavy gradient sort of look that she recently did. I gave it my spin, and picked out a color palette that I am loving so much right now. And I added studs. Because studs.


Used:

O.P.I. - MVIB
Revlon - Urban
O.P.I. - Funky Dunky
Bettina - Wild Orchid

Born Pretty Studs

I'm pretty sure this is one of my all time favorite designs I have ever ever done. It just looks so frickin perfect! It just makes me super happy looking at them. And naturally, I am thinking of how many ways I can replicate this and what colors would look awesome. I definitely think a citrus toned designs would be bananas!


On a side note, Wild Orchid is the only Bettina I have and I really love it. Bettina isn't sold any where near me, and I am a sad polish addict. I know there is a lady who does wholesale orders (I found the contact info a long time ago, but have since lost it). But I am wondering what colors would be good to put on a wishlist? Do you guys have any Bettina? Any favs that I absolutely need?

Have a great weekend, and try to freeze!

Tuesday, January 21, 2014

Scoflaw Nail Varnish Chromasaurus Hex

Hello friends! Today, I have a fun new-to-me Indie polish to share! It has become a mission, of sorts, for me to try out more indie brands. Scofflaw is a newer brand on the vast market of hand made polish, but it really stands out in the crowd, at least I think it does!

One of the first things I noticed was the unusual color combinations in every bottle of polish in the Scofflaw line. I loooooove atypical color mixes, and I have been lurking their shop for a while. My resolve finally broke with the newest collection and I snagged a bottle of the coolest named polish in my stash - Chromasaurus Hex.

Please Note: Products shown were purchased by me for my personal use.

Before we get to the pretty swatches, can we just take a minute to ogle the amazing packaging?!? Seriously, there is so much thought and attention to detail that I was totally blown away when I opened my mailer. Look at that T Rex!!! It is so matchy with the polish that I want to cry! Every aspect of the Scofflaw branding is flawless. This is marketing perfection.


Scofflaw Nail Varnish - Chromasaurus Hex

Chromasaurus Hex is a muted lavender taupe with lime green shimmer and pale gold, lime green and dark green hex glitters as well as dark green square glitters. It is a touch darker and less purple than my pics show. But see what I mean? Who would have thought to combine these colors together, and make an insanely gorgeous polish with it?! I love it so hard. Formula was flawless, perfectly smooth and glitter ratio. 2 easy coats for full coverage.


Macro

 So I am truly impressed. This, to me, is what Indie polish is all about. I think it is such a great thing to find unique polish like this and makes my little polished heart beam! Pretty sure I will be adding more Scofflaw polish to my collection, so I hope you like what you see!

Please Note: Products shown were purchased by me for my personal use. All opinions are my own. For more info, please read my disclaimer.

Scofflaw Nail Varnish is available on line. Products retail for $9 a piece. The next restock is February 7th, 2014.

Sunday, January 19, 2014

Sunday Stamped: MoYou London Butterfly Wings

Hey everyone! Hope you guys are having a great weekend! We are having a family dinner today with my sister-in-law who is visiting from Florida. I'm really excited to see her, she is an amazing MUA and I am dying to pick her brain and learn a few tips! I really cannot get the hang of tight lining and I end up looking like a raccoon or a "lady of the evening," so yeah, I need some help!

Since it is Sunday, I have another stamped mani to share with the awesome MoYou London stamping plates! I love them so much, and the squishy stamper (review here) makes the whole thing a lot easier and more enjoyable!


Used:

O.P.I. - Black Onyx stamped over Takko Lacquer - Pucker Up

MoYou London stamping plate Pro Collection #03

I think one of the first stamping ideas I had, when I ordered the plates, was this. It has been so long since I have worn Pucker Up and I really thought it would be so pretty with a butterfly wing stamped on top. The MoYou Pro plate #03 has a lot of animal/nature prints on it, and I got it for the sole reason of the butterfly wing. I love how the squishy stamper was able to pick up and transfer the tiny intricate lines! Needless to say, I am still so impressed with all of the products. So much so, that I have another order on the way to me! Pretty sure MoYou will be my newest addiction.


So have you guys caved and ordered anything from MoYou yet? Are you feeling the craving? I am pretty sure my Bundle Monster plates are going to be collection dust for a while!

Saturday, January 18, 2014

Rescue Beauty Lounge Réveillon

Hey y'all! So I am still trying to work my way through my polish haul from the holidays (I may have gone over board with the shopping!) and I finally managed to grab a couple of RBLs from the Fan 2.0 collection. If you haven't checked out the set, you really should. Every single polish is simply stunning!

Please Note: Products shown were purchased by me for my personal use.


Rescue Beauty Lounge - Réveillon

Réveillon is a soft, dusty blue with a delicate silvery pink shimmer. While the shimmer is quite noticeable, it was ridiculously hard to capture in photographs. I am simply in love with this polish! It has such a dreamy quality that I just can't get over. I love the muted blues like this, but more often than not, they don't love me back and tend to give me the dreaded lobster hands. But I can't resist them! Réveillon, however, is very flattering on me! This may be my new favorite RBL and I may need to get a back up, because it is one that I will be wearing a lot!

Formula was superb as always. The polish was smooth as easy to apply, no issues what so ever. This is 2 buttery coats.


Sigh...isn't it perfection? I really love the Fan created colors, and I love that Ji did a collection like this. What an awesome way to say "Thank You."

I also have Coquette from the collection and will be posting it in a few days!


Thursday, January 16, 2014

Bliss Polish Valentine's Day Collection

Hey guys and gals! So Valentine's Day is a little less than a month away! While I'm not one to go crazy over the holiday, I don't mind it so much. I don't need a special day to show my husband that I love and appreciate him, but I have no problem with spending a day focused on love and kindness rather than something negative!

Today I have the Valentine's Day themed collection from the fabulous Bliss Polish. I really think this is the best collection Yvette has created and I am thrilled to share it with you guys! Also, I want to apologize to your wallets before hand. Because they are gonna cry after you see these swatches!

Please Note: Products shown were provided by the company/creator for review purposes.


Bliss Polish - Mint 2 Be

Mint 2 Be is a soft mint green with a linear holo effect. As soon as I unpacked all the polishes, I immediately swatches Mint 2 Be. It is frickin gorgeous, the color is perfection and the holo effect is amazing. Formula was a bit on the thicker side, but not problematic. If you don't prefer thicker polishes, a couple of drops of thinner is all you need to make this beauty work. This is 2 coats (I didn't add thinner to mine) of minty holo goodness. Dry time was a little longer than average due to the thicker base, but if you wait in between coats, you shouldn't have any issues.


Bliss Polish - Wine And Dine

Wine And Dine is a cranberry red with a linear holo effect. No body makes a red quite like Yvette! You guys know how I feel about reds, and I seriously love every single red shade I have swatched for Bliss Polish. Wine And Dine is no less beautiful! The holo is not as strong as Mint 2 Be, but it is still very pretty and gives such a nice depth to the polish. This is 2 coats, and the formula was a perfect consistency.


Bliss Polish - Kismet


Kismet is a squishy bright lavender with a gorgeous blue iridescent shimmer. It leans a touch more red than my photos, my camera likes to turn purples very blue. I love this one so much! It is bright and fun and super cute! The jelly base has the perfect amount of squish and the shimmer is amazing! Formula was awesome. 2 coats for full coverage and no issues at all with cuticle drag or streaks. LOVE!


Bliss Polish - Destiny (Matte)

Destiny is a bubble gum pink with silver micro flakies and dries to a soft satin finish. It is soft and delicate and at the same time bright and bubbly. If you are a pink lover, this shade will knock your socks off! I still can't decide if I like it better matte or glossy. I think both ways are super pretty, and you can see different sides of the polish each way. Again, this is 2 coats with a good formula.


(Top Coat)


Bliss Polish - Smooch
Smooch is a raspberry jelly filled with pink, brown and gold hex glitters in various sizes. Holy crap this is an awesome polish! As with Kismet, Smooch has an amazing squishy jelly base and the glitter mix goes along perfectly with it! I love the unexpected brown bits, they add a really interesting dimension to the polish. @ coats, great formula, awesome.


Bliss Polish - XO

XO is the teal counterpart to Smooch. It has the same glitter mix, swapping out pink glitter for blue. And I love this one just as much! The teal base color is frickin gorgeous! I did have a problem with the glitters sinking with this one, and ended up doing 3 coats to get enough glitter to my liking. Other than that, it was a great polish.


I honestly cannot pick a favorite, or recommend one over another. The entire collection is great and there is something for everyone! Like I said, Yvette has really outdone herself and I am so impressed by every single polish in the set! So break out your wallets, kids, and have fun picking out some gorgeous colors!

Please Note: Products shown were provided by the company/creator for review purposes. All opinions are my own. For more info, please read my disclaimer.

Bliss Polish is available on line. The Valentine's Day collection launches January 20th. Products retail for $8 a piece.

Sunday, January 12, 2014

Sunday Stamped: Bundle Monster 2013 Plates

Hey y'all! Along with the new MoYou London plates I recently acquired, I also got the new Bundle Monster 2013 stamping plate collection. It is full of really great images, some inspired by the nail art community, and others inspired by current trendy hipster things. Needless to say, I am super excited!

Please Note: Products shown were purchased by me for my personal use.


Blue protective cover. Remove before stamping.

The Bundle Monster 2013 stamping plate set consists of 26 plates with full sized images as well as decal-like images.


Paper backing.


Plates BM401 - BM409


Plates BM410 - BM418


Plates BM419 - BM426

Now for the good stuff! I know you guys want to see more than just the plates! So here is the first mani I did with the new Bundle Monster 2013 stamping plate set.


Used:

Color Club Halo Hues - Eternal Beauty over Essie - Mint Candy Apple
Stamp Plate - BM404

I used my new MoYou squishy stamper with the plates, and found that the Bundle Monster plates don't work as well with it. The small intricate images - like the one I chose to stamp with - work fantastic! Better than I have ever done. It is the more open designs (like plate 403) that I had problems with. I think the main issue is that they are not engraved as deep as the MoYou plates and don't hold as much polish. I have the MoYou red stamper ordered and will be doing some test runs once it arrives. Other than that, I love the plates and am excited to play around with them!


Stamping is still such a challenge for me, but I hope to rectify it with all the new goodies I have, and keeping up with Sunday Stamped. I definitely need the practice! Hope you guys have a great Sunday!

Please Note: Products shown were purchased by me for my professional use. All opinions are my own. For more info, please read my disclaimer.

Bundle Monster stamping plates are available online. The 2013 set retails for $16.50, individual plates retail for $1.99 a piece.

Saturday, January 11, 2014

Hare Polish Bisbee 2.0

Hey everyone! Happy Saturday! My weekend plans involve painting of a different kind! We are doing a bit of remodeling, and I am super excited! It has been an ongoing project to redo my daughter's room and give her a super cool space that is just or her. It has taken a long time, but we are finally ready to paint and put together the last of the finishing touches. I cannot wait to see what it all looks like once we are 100% done. I'm hoping to make it a birthday present for her in July.\

Recently, I have been on a lemming busting spree and managed to knock out a few coveted polishes, which is always exciting! One in particular, isn't a HTF or discontinued, just something I have been putting off purchasing for some unknown reason. Part of my holiday gift haul included two more Hare Polish babies, one being Bisbee 2.0, a lemming from pretty much the start of my collection career. Like I said, it was never not available, I just never grabbed it, until now!

Please Note: Products shown were purchased by me or my personal use.


Hare Polish - Bisbee 2.0

Bisbee 2.0 is a bright turquoise jelly with golden shimmer and yellow gold square and hex glitters. This is an updated version of the original Hare Polish, Bisbee. Like it's predecessor,  it is inspired by the turquoise mines of Bisbee Arizona. It is a really beautiful, complex polish. The shimmer changes slightly at different angles and lighting, flashing a bright green. The turquoise base has just the right amount of translucence, allowing the glitters to appear as if they are floating. Love, love, love! This is two super easy coats with perfect glitter distribution. It dries to a satin finish, which is really pretty! I topped it off with my usual combo of HK Girl followed by Glossy Glam.


 I would love to see this mattified, but alas my matte tc has gone all goopy and thinner fails to revive it! I am now looking for a new one, so if you have a favorite, please leave a comment!

This is such a great polish, and a fantastic example of why Indie polish is so awesome! Where else would you get such awesome inspiration, and an equally awesome result?! Also, I am kind of ashamed I waited so long to grab this!! What was wrong with me? Thankfully, I have seen the err of my ways. 

Please Note: Products shown were purchased by me for my personal use. All opinions are my own. For more info, please read my disclosure.

Hare Polish is available via Etsy. Products retail for $10 a piece.

Thursday, January 9, 2014

Essie Luxeffect Jazzy Jubilant

Hey y'all, hope everyone is having a great week! It has been nice getting back to my normal routine and having some time to myself during the day to do blog stuff and watch awesome tv. My current fav is a BBC show called Misfits. It is hilarious! But enough about my tv habits, I have a new glitter topper that is super pretty!

Please Note: Products shown were purchased by me for my personal use.


Essie Luxeffects - Jazzy Jubilant over O.P.I - Glints Of Glinda

Jazzy Jubilant is a glitter topper in a clear base. The glitters consist of small silver, purple and teal hex glitters as well as green and red micro glitters. Essie re-released the Luxeffect toppers this holiday season along with two new polishes, one being Jazzy Jubilant. I was on the fence about this one for a while, but I am really glad that I caved and got it! It is a really pretty mix and something a little special, I think. The formula was a little thin for glitter, it took a bit of dabbing to get good coverage. Other than that it is a great addition, and I love how it looks over the squishy nude Glints Of Glinda!


Yep, definitely a great combo. I  wasn't able to wear it as long as I wanted to, such is the life of a polish blogger! But I will be doing it again soon, for sure!

You might still be able to find a bottle or two in a Luxeffect display, and hopefully Essie will add it to their permanent line along with the older Luxeffect polishes.

Please Note: Products shown were purchased by me or my personal use. All opinions are my own. For more info, please read my disclaimer.

Monday, January 6, 2014

Frozen Lattice Gradient with Pure Nail Polish And My First Video Tutorial

Hey guys and gals! Just a quickie post today. It's brrrrrchilly all over the dang place, and we have record temperatures here in Austin! We honestly don't know how to handle anything below freezing! But in the spirit of the frozen weather, I have a fun design and a bit of an announcement!
 
I have my very first video tutorial! I will be doing a series of videos for Pure Nail Polish, as a featured nail artist! I am super thrilled and have so many fun ideas for you guys! The first one I did is a frosty version of the Lattice Gradient nails I did over the summer.
 
Please Note: Products used were provided by the company/creator for artistic purposes.


Used:
 
Pure Nail Polish in -
Blameless (white)
Lucid (blue)
Committed (silver foil)
 
Makeup sponge
Nail art brush
 
So this is definitely one of my favorite designs I have done, and I love that you can use virtually any color combo! And it is a lot easier to accomplish than it looks! The key is to use a very thin, small brush. You can see a shot of it in the video.


Now for the awesome part, the video tutorial! Be sure to view it in the HD format. Unfortunately, it was uploaded to YouTube in HD, and a lot of the video quality was lost.  -__-


A very big thank you to my awesome husband who filmed/edited the video! He is quite fantastic and rather supportive of my addiction hobby!

So I hope you guys like the video, and be sure to follow the blog so you can see more videos in the future!

Please Note: Products used were provided by the company/creator for artistic purposes. For more info, please read my disclaimer.

Pure Nail Polish is available on line. Products retails for $5.00 a piece (clearance price)
Related Posts Plugin for WordPress, Blogger...