Showing posts with label Maybelline. Show all posts

Tuesday, December 22, 2015

Twinsie Tuesday: Holiday Special

Hi friends! Happy Holidays to you all! Today is the Twinsie Tuesday group's special holiday post. This year, it is a general holiday inspired theme as opposed to something more specific. I prefer the open-ended themes because I have more wiggle room if an idea doesn't work out - like this one.

I legit tried three different designs and a total of five manis before one worked out. Ugh. And the one that did was much more simplistic than what I wanted, but I'm not gonna argue after four horrid attempts!


Tuesday, July 14, 2015

Twinsie Tuesday: Revisit A Theme

Hi friends! Well it looks like I missed a whole week of posting and we are back to another Twinsie Tuesday post. In my defense, I have been working on the story I am writing like crazy. Unfortunately nail polish and blogging have been severely neglected, but I do have some Sally Hansen polish that I need to post in the very near future!

For today's Twinsie theme, we are revisiting a previous them that we missed out on the first time around. One of the first themes I remember skipping was the Negative Space theme. It has been a nail art "to-do" for quite some time and with all the craziness of my life over the last year, it just never happened. So yay for second chances!

Tuesday, July 7, 2015

Twinsie Tuesday: Neon

Hi guys and gals! Ready for another Twinsie post? This week we are doing neon nails! I am all about bright polish, so this was a really fun theme for me.

I combined one of my favorite things, a gradient, with leopard print. This is something that when I first started nail art I didn't like all that much, but now it seems that I have wanted to do it more and more often. And I definitely love it for summer!


Thursday, March 26, 2015

Foil Tattoo NOTD

Hey y'all! So I am sure most of you know what foil tattoos are and how insanely cool they look. I have seen a few pics around using them as nail decals and omg, why a perfect idea! I am a total magpie and am instantly drawn to anything shiny or sparkly (ahem..nail polish!) and knew I needed some foil tats asap. I didn't want to spend a lot on my first go, (the original Austin-based company, Flash Tats sells a package for $20-$30) so I found a very cheap sheet of foil tattoos with a few designs that I could easily translate into nail decals.

Thursday, March 19, 2015

Ethereal Gradient NOTD

Hey y'all! So I actually did some nail art that isn't related to my TT posts! Not to say that I don't being a part of the Twinsies, but it has been a long time since I have felt inspired to do much nail art outside of our weekly prompts. But I seem to have come out of my slump! Hopefully this creative energy will stick around a while!


Wednesday, December 31, 2014

Happy New Year's Eve!!!

Hi friends! Sorry I have been M.I.A. for the past few days. All the holiday celebrations over the last week have kept me quite busy with little time to blog! Can you believe it is New Year's Eve?! I just can't get over how fast this year has gone. What a whirlwind it has been.

Since it is NYE, I had to do something and end the year with some nail art! I just wouldn't be a proper nail blogger if I didn't, lol!

Thursday, December 4, 2014

Matte Skittlette Nail Of The Day

Hey guys and gals, short and sweet post for you all today - we had a loss in the family yesterday and all my energy is being devoted to that. But I did want to share my nails, because: one, it makes me happy to blog and I need it right now, and two, sometimes a mani is just too good not to share!


Tuesday, July 8, 2014

Twinsie Tuesday: Stripes

Hey guys & gals! Time for another Twinsie Tuesday post! Today's theme is stripes, something I love but never ever do.


Used:

O.P.I. - MBSW
Maybelline Color Show Bleached Neons - Son Of A Peach
Maybelline Color Show Bleached Neons - Day Glow Teal

Striping tape

Yep, still lovin' the bleached neons. Perfect for nail art and summer manis. I have seen some displays floating around, so if you are looking for them, don't give up!


Well that's all from me today. We're off to swim class! Don't forget to check out the stripes of my fellow TT ladies. And have a great Tuesday!


Alaina at The Little Canvas
Amanda at Amandalandish
Chelsea at Nailed Blog
Cordia at Seriously Swatched
Elizabeth at Did My Nails
Jessica at Blue Velvet Lacquer
Kelly at Tuxarina
Lakeisha at Refined and Polished
  Marisa at Polish Obsession
Róisín at Cuti-CLUE-les
Stephanie at A Little Polish
Tiffany at Polished To Precision

Tuesday, June 24, 2014

Twinsie Tuesday: Beverage/Fruit

Hey guys and gals! Welcome to the Twinsie Tuesday post! This week's theme is food or beverage, and since I am in a definite summer mindset, I did something inspired by my favorite summer drink - pink lemonade! 


Used:
Maybelline Color Show Bleached Neons - Pink Punch
O.P.I. - I Just Can't Cope-Acabana
O.P.I. - MBSW

Dotting tool

Pink lemonade is a classic summer drink in Texas, and I always associate it with being a kid & having BBQ cook outs with my family. Of course now I enjoy my pink lemonade spiked! ; )


The inspiration for my pink lemonade nails came from Pam's Girly Bits that I found on Pinterest. That's all for today, but be sure to check out the rest of the Twinsie posts!


Alaina at The Little Canvas
Amanda at Amandalandish
Chelsea at Nailed Blog
Cordia at Seriously Swatched
Elizabeth at Did My Nails
Jessica at Blue Velvet Lacquer
Kelly at Tuxarina
Lakeisha at Refined and Polished
Marisa at Polish Obsession
Róisín at Cuti-CLUE-les
Stephanie at A Little Polish
Tiffany at Polished To Precision

Monday, June 16, 2014

Loaded Lacquer Wasabi With You?

Hey friends! Hope you all had a great weekend! Since it was Father's Day, we spent the day with my f.i.l. and my husband's family. It was a really nice and relaxing day, and I got my first sunburn of the summer. Not so good, but fair skin and Texas summers do not mix!

Today I have a really fun glitter perfect for summery manicures! Loaded Lacquer is a newer Indie brand that has really taken off! When I saw the first line of polishes my friend Casey Lane swatched I was totally blown away. It took me a while to get a polish because they sell out super fast, but it was so worth the wait!

Please Note: Products shown were purchased by me for my personal use.


Loaded Lacquer Wasabi With You? over Maybelline Color Show Bleached Neons Ultra Violet

Wasabi With You? is a glitter topper with small chartreuse green square and teal holo hex glitters in a clear base. I don't have a whole lot of glitter toppers in my stash, mainly because I am super picky about glitter mixes. But this, I love! It is so simple and so perfect. Formula was good with an even distribution of glitter. I used the dab and spread method for application and had no trouble getting glitter out of the bottle. I used 1.5 coats for the swatch photos. It does need a little extra top coat to smooth it out, and I used 2 coats of Glisten & Glow.


(Macro)

Heather, the creator of Loaded Lacquer has such a fantastic sense for color and presentation. It is no wonder Loaded Lacquer has become so popular so quickly! And she is based out of Texas! I may be slightly more biased when my home state is involved!!!

Be sure to check out the restock info if you are looking to score yourself a bottle, as she updates frequently. I plan on picking up a few more myself, when the next one happens!

Please Note: Products shown were purchased by me for my personal use. All opinions are my own. For more info, please read my disclaimer.

Loaded Lacquer is available on line. Products retail for $10 a piece.

Wednesday, April 30, 2014

Maybelline Bleached Neons Summer 2014 LE

Oh hai friends! Many apologies for the sporadic posting as of late! I just don't know what it is about my schedule sometimes. I can go a whole month without anything crazy going on, and then the universe seems to decide to dump everything on me at once! April (running into May) has consisted of school stuff non stop, parties, brunch dates with fellow nail gals, more parties, camping trips, wedding receptions, birthdays. Oi. I don't see a free weekend in sight! I'm hoping to keep posting at least once a week, but don't get too worried if I go radio silent for a little while.

But, I do have a fun summer collection to share today! And I wanted to get these out a.s.a.p. since they are LE (limited edition) so you guys will have a chance to grab them if you like the swatches!

Please Note: Products shown were purchased by me for my personal use.


Maybelline Color Show Pink Punch (Bleached Neons Summer 2014 LE)

Pink Punch is a vivid bubble gum pink neon. The color has a slightly faded, or washed out look going with the "bleached" theme.  This is three coats on its own without a white base. The formula was pretty standard for a neon, streaky and thick. I did experience some cuticle drag in between the first and second coat. Allowing a bit more dry time between the second and third remedied the issue. Top coated with HK Girl by Glisten & Glow for a shiny finish.


Maybelline Color Show Coral Heat (Bleached Neons Summer 2014 LE)

Coral Heat is a red leaning coral neon. It looks kinda dupey for ChG Flip Flop Fantasy, but I don't have it to compare. This is three coats on its own without a white base. The formula was thicker and more difficult to work with, but not a complete loss. Thicker coats, with plenty of dry time in between make application possible. But it is still a pain! Top coated with HK Girl by Glisten & Glow for a shiny finish.


Maybelline Color Show Ultra Violet (Bleached Neons Summer 2014 LE)

Ultra Violet is a vibrant orchid purple neon. Out of all of them, this is the most neon, and captures that "bleached" look the most. This is two coats on it's own, without a white base. The formula was much more workable with a relatively easier application. Top coated with HK Girl by Glisten & Glow for a shiny finish.


Maybelline Color Show Citrus Collide (Bleached Neons Summer 2014 LE)

Citrus Collide is a pastel yellow neon. It has both the pastel and neon quality, without the chalkiness you would expect of a yellow this light. This is two coats on it's own, without a white base. As problematic as some of these are, I expected Citrus Collide to be the worst, but it actually isn't that bad. The formula is thick, but not horribly so (Pink Punch, Coral Heat and Bleached In Peach were all noticeably thicker). After a streaky first coat, a thicker second coat made it opaque. It did have some leveling issues, but top coating it smoothed everything out. I did notice that using a top coat changed the color slightly, bringing out the neon more. Top coated with HK Girl by Glisten & Glow for a shiny finish.


Maybelline Color Show Lime Accent (Bleached Neons Summer 2014 LE)

Lime Accent is a lime green neon.  It again, balances that pastel, yet neon so well. This is three coats on it's own, without a white base. Surprisingly, the formula was very thin and watery. But I was able to get full opacity with three coats, so all in all, not so bad. Top coated with HK Girl by Glisten & Glow for a shiny finish.


Maybelline Color Show Bleached In Peach (Bleached Neons Summer 2014 LE)

Bleached In Peach is a yellow toned peach neon. I am swooning for peach shaded this year, and so wanted to love this one. This is three coats on it's own, without a white base. The formula was in between Pink Punch and Coral Heat in terms of thickness and work-ability. I am hoping that a generous dose of thinner will help it some, because I can't let it go! Top coated with HK Girl by Glisten & Glow for a shiny finish.


Maybelline Color Show Dayglow Teal (Bleached Neons Summer 2014 LE)

Dayglow Turquoise is a bright blue neon. While this doesn't quite have the faded/bleached look as the previous colors, it is still bright enough to be a nice option. This is two coats on it's own, without a white base. It also boasts the best formula out of the bunch, almost a one coater. But I felt that a second coat would give it more life. Top coated with HK Girl by Glisten & Glow for a shiny finish.


I love the concept of this collection. I am all over the bright/neon pastels. And I think these capture the Bleached Neon look quite well. While about half of these are problematic, they are not without hope. In some cases, polish thinner might be a viable option. My favorite, based on color and formula is Ultra Violet, but I have my fingers crossed for Bleached In Peach!

Please Note: Products shown were purchased by me for my personal use. All opinions are my own. For more info, please read my disclaimer.

Maybelline Color Show Bleached Neons are available for a limited time. Products are available at many drugstore locations, including Walgreens. Prices vary by location.

Tuesday, August 27, 2013

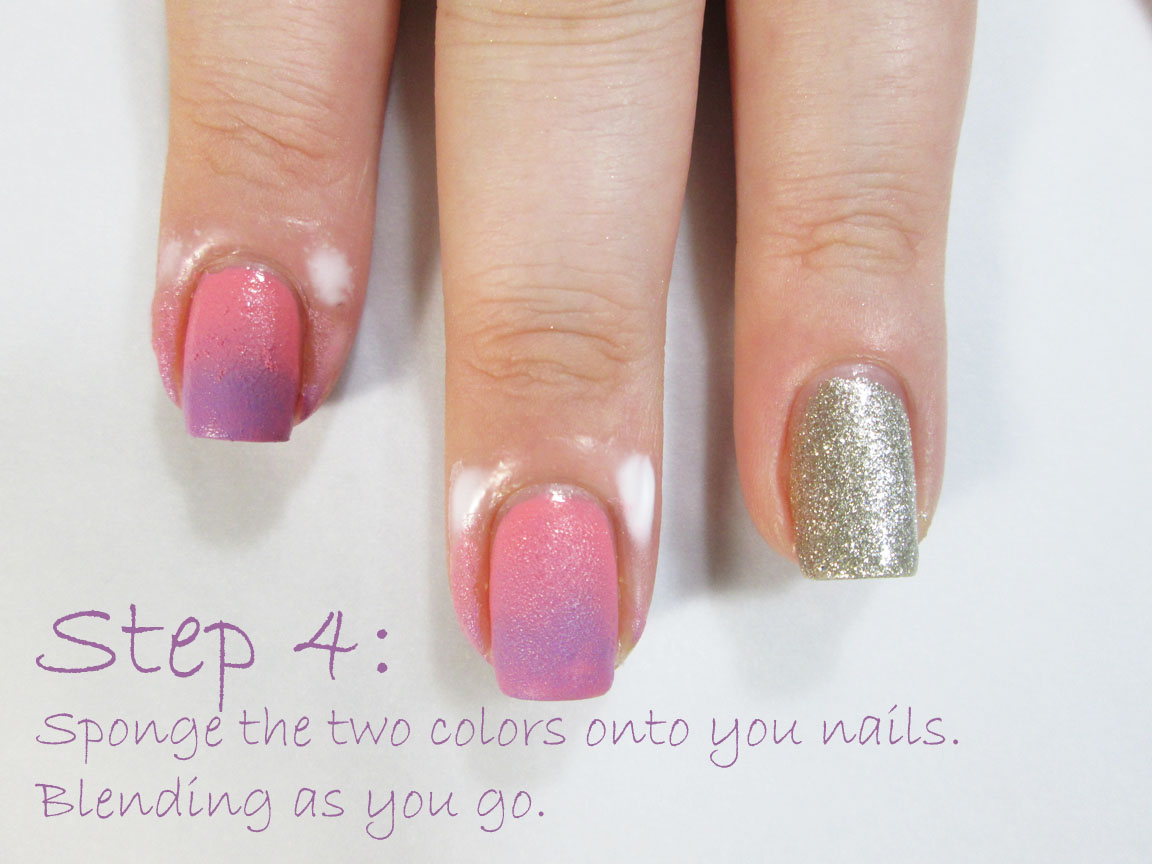
Gradient Fun + A Tutorial!

Hey guys and gals! I have a little something special for today, my first tutorial! I decided to do a gradient tutorial, because not only are they fun and super pretty, but I haven't seen a tutorial for the way I do one, so I wanted to share!

The idea for my nails came from the amazing Marta of Chit Chat Nails. She recently posted a NOTD on IG and I fell in love with the textural mixes.


Used:

(For Gradient)

Sally Hansen Diamond Strength - Sweetie Pie
Bondi NYC - Uptown Girl
Maybelline Color Show - Clearly Spotted

(Accent Nails)

Essie - Beyond Cozie

Now for the good stuff! I have photographed step-by-step instructions for my gradient method. It's pretty basic, but if you should have any questions, please don't hesitate to comment! Have fun!


I would love to know what you guys think, and perhaps maybe ideas for more tutorials in the future!

Thursday, August 1, 2013

Watermelon Nails: Nail Of The Day

Hey everyone! I have a little summer nail art for today's post. We only have about a month left of summer before my little one starts her first year of school, but I am holding on to these last days with everything I have. I think this might actually be my first official summer design since everything has been done according to the nail art challenge. 

 
Used:
 
Zoya - Maya
Color Club - Wild Cactus
Wet n Wild Wild Shine - Stand The Test Of Lime
Maybelline Color Show - Clearly Spotted
 
Nail Art brush

I fell in love with the idea of watermelon nails from Sarah of Chalkboard Nails. Her take was really fun and I wanted to do my spin on the design. Can I just admit right now that I may have squealed when I finished them?!? So super cute and totally doable! Aside from doing a jelly sandwich with Maya and Clearly Spotted, I just used Stand The Test Of Lime and my striper brush to paint a few stripes on top of Wild Cactus. Easy peasy, folks.


Nom. Who doesn't love watermelon in the summer?!


That's all for today! Hope you have a great one!

Saturday, July 6, 2013

31 Day Nail Art Challenge: Inspired By A Book

Hey lovelies! So obviously, I am super off schedule with my challenge posts this week. Just too much going on with little birthdays and fire works to have any real time for nail art.
 
This post is "Inspired By A Book" and I really struggled to find the perfect book for this. I am a huge book nerd and I am one of those people who can get lost in a good story. My favorite book(s) is the Harry Potter series. But it has been done a ton of times in the realm of nail art and I really wanted to do something different. It took a few days to make a decision, but I finally did, and am beyond happy with it!
 
 
I actually just finished reading it to the small person a few weeks ago and fell in love all over again with Pippi. She was one of my literary heroines as a kid, and I still admire her tenacity and good nature today.

 
Used:
 
Zoya - Arizona
 
Middle Finger:
Julep - Ingrid
Essie - Brooch The Subject
Sally Hansen Insta Dry - Butter-Fly Stroke
Sally Hansen Xtreme Wear - Black Out
 
Ring Finger:
O.P.I. - MBSW
Maybelline Color Show - Paint The Town
Essie - Brooch The Subject
Sally Hansen Xtreme Wear - Black Out
 
In the end, I couldn't have picked a better book to use and I am so happy with how it turned out. Hopefully, Pippi would be proud!


I will be trying to play catch up next week. I still have to post the rest of the Essie summer collection and I have an awesome Thermal polish to share as well! Hope you all have a great weekend!

Thursday, June 6, 2013

31 Day Nail Art Challenge: Tribal

Hey everyone! Today is all about Tribal nails! This is one of the challenge posts that I was most looking forward to when I started. I looooove tribal nail art, but it has always seemed really intimidating. The designs are always so intricate and complicated and beautiful. I honestly wasn't sure I could pull it off. It took me forever to decide on a design, and then I finally managed to create my first free hand tribal mani!
 
 
Used:
 
O.P.I. - MBSW
Maybelline Color Show - Green With Envy
Sally Hansen Insta-Dry - Butter-Fly Stroke
Color Club - Coral Cascade
Sally Hansen Xtreme Wear - Black Out
 
Nail art brush
 
Only one picture today. My memory card cracked while I was taking pics. Boo. At least I got a usable shot, because it took me soooo long to do! But hot damn, I love it. Perfect, definitely not. My lines are not the smoothest or most even, but I am in love with the design and colors! And I am super proud of myself for being able to do it! Yay!
 
I'm about half way through the challenge, this was number 16 on the list. It has been awesome up to this point, but I know the last few ones are going to be really hard. Hope you are as excited as I am!
 

Friday, May 31, 2013

Fashion Friday #8

Hey guys! I've got a Fashion Friday collab post for you all today! This week is all about stripes and color blocking. Both are very popular fashion trends and can easily translate to nail art!


Used:
 
Maybelline Color Show - Paint The Town
O.P.I. - My Boyfriend Scales Walls
Sally Hansen Xtreme Wear - Black Out
 
Striping Tape
 
The overall look of the outfit Camille put together has a distinct retro feel, and a classic color combo of red, black and white, really carries that vibe. I love the simple and graphic look of the stripes paired with the red nails.


Used:
 
Zoya Pixie Dust - Beatrix
Zoya Pixie Dust - Destiny
Zoya Pixie Dust - Solange
 
Striping Tape
 
I must say, the earrings in this particular post, are frickin' awesome. I need a pair myself! Even better when I can use the Pixie Dust polishes to make some badass color blocking designs to go with them! I have seen quite a bit of nail art done with Pixie Dust polishes lately, and I can certainly see why. They are ridiculously easy to use and look fantastic; very visually appealing.


More fun coming up this next week! I have another textured polish review for you guys, as well as, some Born Pretty studs and of course the 31 Day Challenge continues! On time...hopefully...

And be sure to give Camille's style blog some love. Especially if you have a soft spot for great hand made accessories!
 

Thursday, May 30, 2013

31 Day Nail Art Challenge: Floral

Second post today! Floral is the theme for this post, and I was inspired by this poppy design from Little Nails. I actually found it via Pinterest and had to do some digging to find the proper source, as it wasn't credited at all. I love using Pinterest for nail art inspiration, but jeeze it can be difficult to find the original artist.

 
Used:
 
O.P.I. - My Boyfriend Scales Walls
Maybelline Color Show - Paint The Town
Sally Hansen Xtreme Wear - Black Out
Revlon - Posh
 
Dotting Tool
Nail Art Brush
 
I really love poppies. They are so simple, yet so beautiful at the same time. Overall, I am really pleased with how this turned out. I kinda wish I had made different colored poppies, but was feeling completely uninspired at the time. Still pretty, I think.


A new Fashion Friday collab post is on the schedule for tomorrow, and it's pretty dang awesome!

Sunday, March 17, 2013

Color Club Wild Cactus & a St. Paddy's mani!

Happy St. Patrick's Day! I have to admit, I love St. Paddy's Day and when I was a single gal, I would celebrate with my friends and drink several Irish Car Bombs (half a pint of Guiness, with an Irish wiskey & Bailey's floater). Today, instead, I have a wonderful green polish from the Color Club Fiesta collection, to celebrate with!


Color Club - Wild Cactus
 
Wild Cactus is a rich saturated emerald green cream. Perfect for St. Paddy's Day and Pantone's color of the year. I love, love, love it! It is such a vivid green! Sigh. Formula was good, not stellar, but easy to work with. I had a tiny bit of drag on the second coat, but it leveled out okay as it dried. 2 coats, good dry time. It stains really bad, though, one of the worst I have seen.
 
And since this is a special post, I did a fun little mani! Green and gold, glitter and holo, can it be any better?!?

 
Used:
 
Color Club - Wild Cactus
Maybelline Color Show Sequins - Gold's Night Out
Takko Lacquer - Maneki Neko


Look at all that holo sparkly goodness! Dies. Happy St. Paddy's Day!

Thursday, March 14, 2013

Nail of the Day: Spring Color Blocking

Good morning all! It looks like Spring has finally made it's way to Texas, well Austin at least. I love spring time even though my allergies don't. Right now everything is perfect; gorgeous weather, birds singing and little green things are popping up all over the place! Also, all the pastel colors are really inspiring, and I came up with this fun color blocking mani. I love it so much, and wore it for almost 3 days! 
 
 
Used:
 
Maybelline Color Show - Green With Envy
Julep - Adrianna
China Glaze - Tart-y For The Party
 
Striping Tape
 
Overall, it is an easy look to achieve, it just requires a bit of patience. I am really loving the striping tape. It is a lot easier to make nice clean lines, as opposed to regular scotch tape.


Don't forget to check out my give away - here - and you could win striping tape to create a similar look!

Sunday, September 23, 2012

Nail of the Day: Show some PRIDE!

This weekend was Gay Pride in Austin. To show my support, I painted a Pride inspired mani!

 
The LGBT community holds a very special place in my heart. My mother-in-law is gay, and I have gone through my own struggles of gender identity and sexual experimentation. My first Pride celebration was an amazing experience, and something that I will never forget. I hope to take my daughter one day (when she is an adult!) to a pride with my husband and m.i.l. We want her to understand, above all, that everyone deserves to be loved, and we should all be able to love who we choose. Now enough of my soapbox, on to the mani! ; )

 
I decided to try some very basic nail art and free handed a rainbow striped accent nail, along with the "NO H8" logo on my middle finger. My stripes and lettering aren't the best, so be kind!
 
I used Spoiled by Wet n Wild Visibly Slimming black cream as a base and the following colors for the rainbow stripes:
 
Sephora by OPI/Betsey Johnson - Pushing Your Luck
Sally Hansen Xtreme Wear - Sunkissed
Maybelline Color Show - Fierce N Tangy
Maybelline Color Show - Go Go Green
Nails Inc - Baker St.
Zoya - Dannii
 
For the "NO H8" lettering, I used:
 
Maybelline Color Show - Porcelin Party
Zoya - Dannii
 
 
For more info on Austin's Pride community, please check out Austin Pride.
 
 
Please remember to respect my opinions, if you leave a comment, and I will respect yours. Any offensive or derogatory comments will be removed and the author will be blocked. Thank you & have a nice day!
Related Posts Plugin for WordPress, Blogger...